Beauty Bar Blogs
HOW TO GET THE PERFECT BEACHY WAVES

When you think of hairstyles in the summer, you probably think simple and beachy. And I know when I think beachy, I think waves (the hair kind). However, yanking out the curling iron, waiting for it to heat up, then taking the time to curl every single piece of hair can be very time consuming. So today, I’m going to share with you my fast and easy method for beachy waves. This hairstyle takes me less than 10 minutes to do. It’s my go-to look— especially in the spring and summer. Loose curls give you that beach bombshell look, yet it’s still appropriate to wear for a more formal affair like a business meeting or a nice dinner.
Here’s what you’ll need to achieve this look:
A clip-less curling wand: The one I use is a 25mm NuMe Magic Wand. It has controllable heat settings and heats up very quickly, which helps save time. I usually heat up my wand while finishing my makeup. However, if you happen to be in a time crunch, this baby will be ready to play within just seconds. I like to use a smaller wand because my hair is thin and does not hold a curl very well. Using a smaller wand to achieve smaller curls will give you a long lasting loose wave once the curls cool down and get combed out.
Product: Before blow drying my hair, I typically use a styling product and heat protectant. I also like to use a texturizing product, like a salt spray or dry shampoo, to help rough up the texture of the hair so that the curls will last longer. However, the most important product needed is a good hairspray. I like to use a firm hold spray, let the mist set into the hair, and then comb out the curls with my fingers into the desired style. The hairspray I’m currently using is Sexy Hair Spray & Stay.
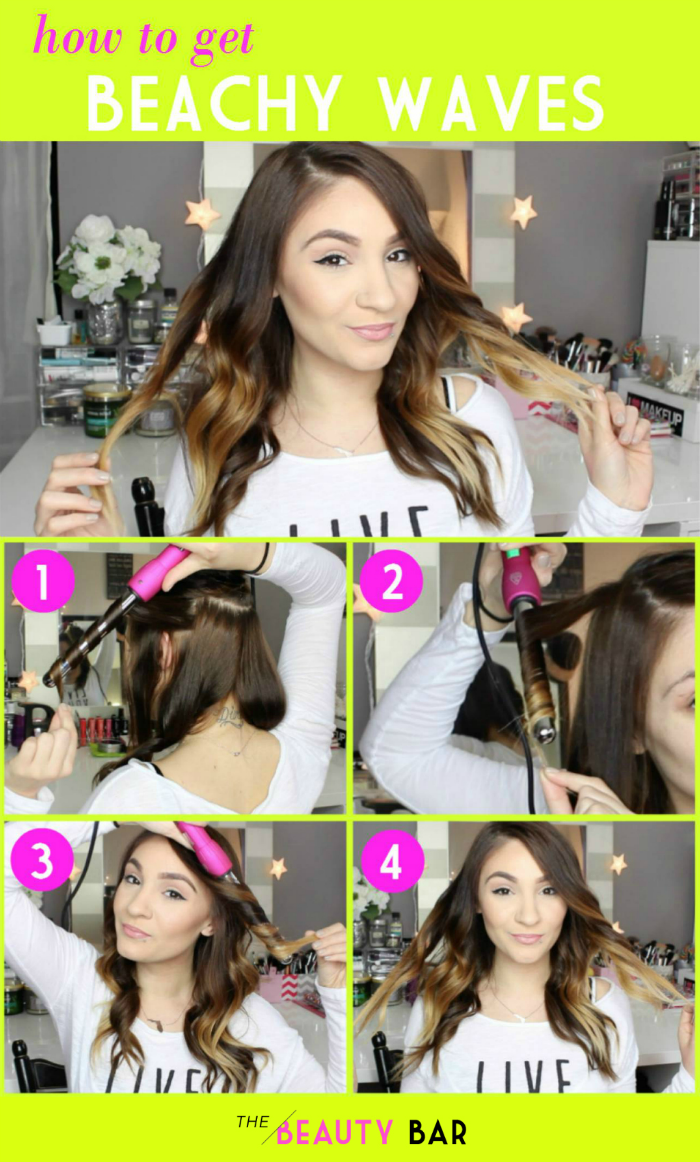
Now you’d probably like to know how I actually achieve this look. Let me break it all down for you, step-by-step:
1. Once my curling wand is heated at a safe temperature, I section my hair. The first section I take is in the nape/neck area.
2. Since my hair is thin, I separate it down the middle and then wrap the hair around the wand away from my face. This leaves about a half inch of my ends straight. Keeping the hair flat on the barrel is key for this look.
3. Moving up the head, take the next section to about the top of the ear. Since there is more hair to work with, I usually keep my sub sections to about the size of an inch. Keep in mind— the bigger the section, the bigger the curl.
4. The next section will be taken up to the temples. Continue to work around the head, splitting the hair down the middle, curling hair away from the face.
5. Once finished, let the curls cool completely before misting with hair spray and tousling with your fingers.
Adding a hairpiece or even a braid to this look makes it look extra special. Or you can keep it simple like I do, and rock it plain-jane. Let me know in the comments below if you try this tutorial! I’d love to hear your tips, tricks, and favorite products for creating that perfect beachy wave!
Oh, and be sure to like The Beauty Bar on Facebook and follow us on Twitter and Instagram for more beauty tips and tricks!
Brittany Lima | Beauty Bartender
Brittany is a full time professional makeup artist & educator from Philadelphia. Whether she’s working on a client or filming YouTube videos, she’s always finding a way to share her industry knowledge. Her sassy yet congenial Northern attitude is what makes her most relate-able to her viewers. She can’t live without music, YouTube, cheesecake, Instagram, pasta, and laughing.

